How to add your own music to iTunes on Windows PC
If you want to add your own music to iTunes on Windows or want to use iTunes as a music organizer and player, here is how you can do that. You can import music, create a playlist, import/export playlist, etc., with the help of this guide.
If you have an iOS device and want to organize music on that device or transfer files from your Windows PC to that device, iTunes is the best option. It is made by Apple to manage your device on your Windows computer. However, you can use the same as a dedicated music player as well. If you already use it for managing songs on your iOS device, you can take advantage of this functionality.
Before getting started, you must create a folder with all the songs you want to import into iTunes. Otherwise, you will have to pick one song at a time, which might consume a lot of time.
How to add your own music to iTunes on Windows PC
To add your own music to iTunes on Windows 11/10, follow these steps:
To learn more about these steps, continue reading.
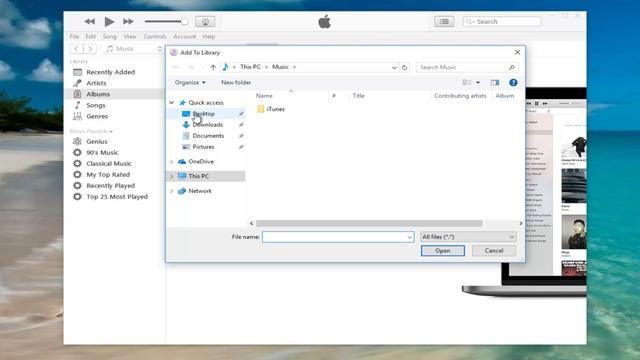
First, you need to open iTunes on your computer and click on the File menu visible on the top menu bar. Then, you have two options – Add File to Library and Add Folder to Library.
If you want to import one song, choose the Add File to Library option and select the song accordingly.
However, if you created a folder with your desired songs and want to import them all, you can choose the Add Folder to Library option.
At times, you might want to listen to a few songs out of hundreds. In such times, you can create a playlist of your favorite songs.
To create a playlist in iTunes on Windows, follow these steps:

Let’s check out these steps in detail.
First, you need to open iTunes on your computer. Then, switch to the Songs tab on the left side and right-click on a song you want to add to a playlist.
Choose Playlist > New Playlist.
As you haven’t created any playlist earlier, you need to select this option. However, if you created a playlist in the past, you could find the playlist name here.
However, for the first-time user, it is required to enter a name for your playlist so that you can recognize it in the future.
Once done, you can repeat the same steps to add new songs to the playlist.
To import and export playlist from iTunes on Windows, follow these steps:
Let’s learn more about these steps.
First, you need to open iTunes on your PC and click on the File menu in the top menu bar. Then, click the Library option.
Here you can find two options – Import Playlist and Export Playlist. If you want to export the playlist from iTunes, you need to choose the Export Playlist option. Then, choose a location where you want to save and click the Save button.
On the other hand, if you already have a playlist and want to import it into iTunes, you can click the Import Playlist option, select the playlist, and click the Open button.
For your information, if you want to migrate a playlist from one computer to another, you must copy all the songs as well. Otherwise, you might fail to import the playlist on the new computer.
To add songs to the iTunes library, you need to follow the aforementioned steps. First, open iTunes on your Windows PC, go to File > Add File to Library, or Add Folder to Library. Then, choose the song or music folder according to the option you selected. Once done, you can find all your contents in the Songs tab visible on the left side.
Although there is no limit on adding music to your library in iTunes, some glitches could prevent you from doing so. In such situations, you can rename the music folder first to check if it solves the issue or not. If not, it is suggested to uninstall iTunes and reinstall it.
That’s all! Hope this guide helped.
Read: iTunes not working on Windows PC.


