How to Create a Mobile Hotspot on Windows 11 Computers
As long as your computer has an active internet connection, you can quickly turn it into a mobile hotspot and share your internet connection wirelessly with other people if you choose to. In this tutorial, I will show you how to create a mobile hotspot on Windows 11 computers. The process is straightforward, follow the steps, and you will be able to set up a mobile hotspot any time you want.
Create Mobile Hotspot on Windows 11
If you used the internet, you must have already faced a moment when a hotspot connection saved you from missing an important deadline, sending an email, catching up with your loved ones, etc. Just follow the steps below:
How to Disable Weather Widget on Windows 11 Systems
Step-1: Click on the Windows icon on the taskbar and click on the Settings cog (shortcut keys to open the Settings app: Win + I).
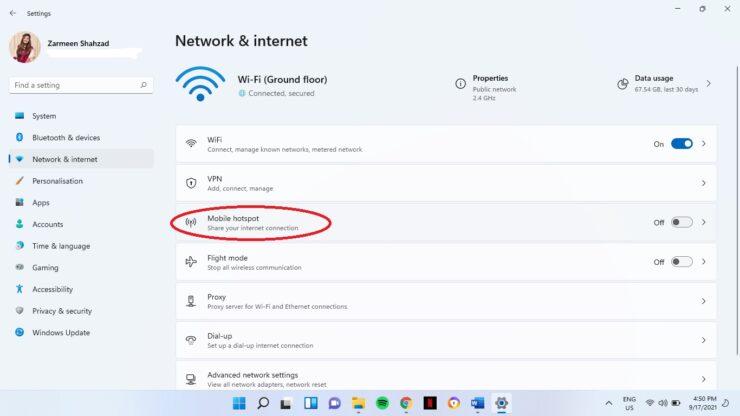
Step-2: From the left pane, click on Network & Security.

Step-3: When the Network & Security settings open, click on the Mobile hotspot option (do not click on the On/Off toggle switch).
How to Change Your Google Account Name on Windows 11 Systems
Step-4: Select the choice that applies to you from the drop-down menu next to the Share my internet connection option.
(Some users may also see another option, Share Over, and a drop-down menu next to it. If you have this option, you can choose how you share the connection, whether through Bluetooth or WiFi, depending on your system configuration)
Step-5: Next to Properties, click on the Edit button.
Step-6: When the editing option open, set a name for the network, a network password, and choose a network band (2.4GHz, 5GHz or keep the default Any available option)
Step-7: Click Save.
Step-8: Now turn the On/Off toggle switch next to Mobile hotspot On.
Step-9: There is another power-saving option available that will be turned On by default. You can switch it Off if you wish.
Did this help? Let us know in the comments below.


