How to Disable or Enable Your Camera on Windows 10
If you don’t want to take the drastic step of putting tape over your laptop’s camera, you can disable it through Windows Settings. Here’s how.
When it comes to your laptop (or other Windows 10 device) and privacy, you might not be fond of the camera staring at your all the time. This is especially true if you don’t use it very often. Sure, you could put a piece of tape over it, but that might not make sense cosmetically. Another option you have is to disable the camera through Windows 10 settings. Here’s how to disable the camera on Windows 10. And how to enable it for the occasional Zoom, Skype, or Microsoft Teams meeting.
Disable or Enable the Camera on Windows 10
There are a couple of ways you can do it. You can use Device Manager to disable the camera. Or, starting with build 21354 and higher, you can use the new Camera Settings page. We’ll take a look using both options.
If you’re running Windows 10 build 21354 or above, start by launching the Settings app. Open the Start menu and click Settings or use the keyboard shortcut Windows Key + I.
From the Settings home page click on Devices.
Next, click on the Cameras tab in the left-hand column. There you will see a list of the cameras connected to your PC. To disable the camera simply click the Disable button.

If you want to re-enable it later just go to Settings > Devices > Cameras and click the Enable button.
We’ve shown you how to completely disable the camera on macOS or Windows 10. And using Device Manager is still an option to disable the camera. Device Manager is one of those classic Windows tools like Control Panel that is still available. Even as more tools and utilities are removed, deprecated, or moved into the Settings app. Device Manager is still part of Windows 10 (for the time being at least).
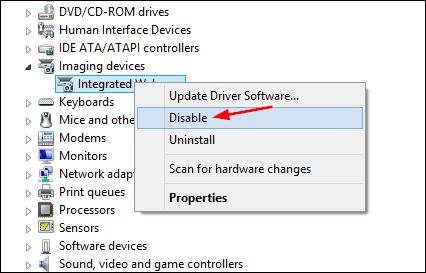
Right-click the Start button and click on Device Manager for the menu. Alternately, you can hit the Windows key and type: device manager or type it in the search field on the taskbar and hit Enter.
Now expand the Cameras menu and right-click your camera device and click Disable device from the menu.
Windows will ask you to confirm you want to disable it. Click Yes.
That’s all there is to it! Your camera will be disabled and won’t work until you go back into Device Manager and re-enable it.
Keeping your Windows 10 computer secure is always a best practice. For more, check out the steps to take to keep your computer secure while you’re away. And to keep your data on the device as secure as possible, read how to enable the Controlled Folder Access feature on Windows 10.
Click to commentYour email address will not be published. Required fields are marked *
Comment
Name *
Email *
Δ
Save my name and email and send me emails as new comments are made to this post.


