How to install an SSD or hard drive in your gaming PC
Adding a second hard drive or SSD to your gaming PC is easy. Provided that you've got room to physically house the drive at any rate. If you've got a laptop then actually squeezing the drive inside the machine is worth investigating before doing anything else, although ultimately the process is the same.
Storage starsThe best SSDs for gaming Whether you want a super speedy boot drive or a large data drive, the best SSDs offer great value for money and brilliantly fast access.
All you need to do is physically connect the drive to your machine (while it's turned off preferably) and then get Windows to configure it and you're done. It generally only takes a couple of minutes and can transform your machine, or at least let you download some more of your massive Steam catalogue.
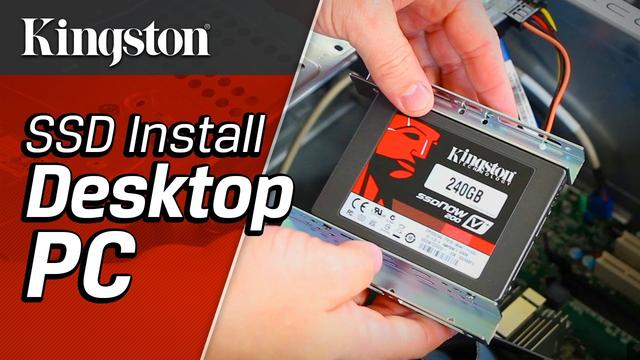
The physical side of things is fairly straightforward, although it depends on what sort of drive you're attaching as to how you actually go about it. If you're adding a hard disk drive (HDD) or a 2.5-inch Solid State Drive (SSD), then you'll need a power cable and a SATA cable. You'll also need to securely mount the drive inside your machine, and not just have it blue-tacked to the bottom of your case for a few years (which, I may or may not have done).
1. Mount your drive
You'll need to find the drive mounting points for your particular case, which may be accessed via the back of your case, or if you're lucky, there may be cages for 3.5-inch drives that are quite clear. Modern cases tend to use caddies for drives, which means you screw the drive to the caddy and then clip that caddy into the cage.
2. Connect the cables
Once the drive is secured, you need to free up a power cable from your PSU and connect it to the hard drive. These only connect one way round, as they use an L-shaped connector. You need to be firm as you attach the cable, but don't force it. Connect the SATA data cable as well.
3. Connect the SATA cable to your motherboard
You should find the SATA cable in your motherboard box if, as they don't come with the drives themselves. Thread the SATA cable through your case and plug it into the SATA port on your motherboard. That's the physical connection done.
4. M.2 SSD installation
Alternatively, if you are adding an M.2 drive, then you need to locate the M.2 socket, which may be hidden under a heatsink on your motherboard. You'll need to unscrew this first to reveal the socket.
Once done, you need to angle the M.2 SSD into the slot and then push it down into the socket. Secure it in place with the tiny M.2 screw, and try not to lose it. This is far easier to do with the motherboard outside of the case, but failing that, grab a torch and put the case on its back so that if you drop the screw (and you will), it won't drop down into the void never to be seen again.
5. UEFI/BIOS check
Whichever kind of drive you have installed, it's worth checking that it appears in the BIOS, just to ensure that it is physically connected properly. Hit [Del] or [F2] as your machine is booting up to enter the UEFI/BIOS. You'll find the drive listed under the Boot section. You don't have to do anything here at this point, just check that the drive is present and correct. Once happy reboot into Windows.

6. Windows 10 Disk Management
When it comes to the Windows side of the equation, you simply need to tell Microsoft's OS what to do with the drive once it is installed. If it's a brand new drive, then chances are Windows Explorer won't even be able to see it, because by default it's a space waiting to be used, but not actually configured in a way that Windows 10 can make use of it.
Right-click the Start menu like an absolute pro and select Disk Management from the list that pops up. The Disk Management app will appear with logical volumes displayed at the top of the screen and physical disks at the bottom.
7. Disk Initialization
If you've just attached a new drive, then it may ping a pop-up over this inviting you to Initialize Disk. Feel free to click OK here, although there is an option attached to this that some of you may want to think about—whether to configure the partition using MBR (Master Boot Record) or GPT (GUID Partition Table). If this option gives you the fear, don't worry about it, just go with the default option.
If you clicked cancel on the pop-up, don't worry, you can bring it back again by right-clicking the box on the left next to the drive and selecting Initialize Disk—the bit where it says Disk 1 (or Disk 2, or Disk 3, etc), with a format type of Unknown and Not Initialized under it. Don't touch the drives that are shown as Online, as you can mess them up if you really don't know what you're doing.
The difference between MBR and GPT isn't worth getting too excited about. GPT is newer and supports larger volumes (above 2TB) but isn't compatible with older versions of Windows. You probably don't care. Go for that unless you have a reason to stick with MBR. You'll also need a motherboard that has supports UEFI BIOS to use GPT, so if it isn't offered as an option, simply stick with MBR.
8. Preparing the drive
Once partitioned, you'll then need to format the drive so you can actually use it. Right-click the large block to the right of the box, which has a black bar on top, and select New Simple Volume from the drop-down box.
9. The New Simple Volume Wizard
A wizard will appear to walk you through the process. Hit Next on the first screen and on the second set the Simple volume size in MB to the maximum capacity, which is the default. Again you can set up multiple partitions here, but you really don't need to.
10. Pick a letter
The third screen lets you set the drive letter for your new drive. Just go for whatever Windows offers up and hit Next, you can ignore the other options on this list unless again you have a very specific use case.
11. Choose your file system
The fourth screen lets you define the File system to use and name the drive. You can just go with the defaults in the vast majority of cases, although naming the drive can be useful for just knowing which drive is which (although not essential). Hit Next.
12. Almost there...
You'll now be presented with the final summary page which covers everything you're about to do. Hit the Finish button and you're done. By default Windows 10 will do a quick format on a new drive, so it won't take long doing this. Once completed, your drive will be opened up in Windows Explorer, ready for you to throw all kinds of junk on it.
13. Benchmark your drive
One thing I like to do at this point is just to check that the drive is performing as expected with a quick benchmark. CrystalDiskMark 7.0.0 is a great tool to do this. Start by downloading it, and then select your drive from the drop-down list at the top, it's probably D: and then hitting the SEQ1M Q8T1 button. It'll take a few seconds to complete, but you'll end up with a best-case scenario for throughput that should roughly match the advertised throughput of your drive. This is the latest PCIe 4.0 drive from Adata, the Gammix S70, so don't be surprised if your scores are much lower.


