Run Your Own Server For Fun (and Zero Profit)
It seems there’s a service for everything, but sometimes you simply learn more by doing it yourself. If you haven’t enjoyed the somewhat anachronistic pleasures of running your own server and hosting your own darn website, well, today you’re in luck!
Yes, we’re going to take an old computer of some sort and turn it into a web server for hosting all of your projects at home. You could just as easily use a Raspberry Pi –even a Zero W would work — or really anything that’ll run Linux, but be aware that not all computing platforms are created equally as we’ll discuss shortly.
Yes, we’re going to roll our own in this article series. There are a lot of moving parts, so we’re going to have to cover a lot of material. Don’t worry- it’s not incredibly complicated. And you don’t have to do things the way we say. There’s flexibility at every turn, and you’re encouraged to forge your own path. That’s part of the fun!
Note: For the sake of space we’re going to skip over some of the most basic details such as installing Linux and focus on those that have the greatest impact on the project. This article gives a high level overview of what it takes to host your project website at home. It intentionally glosses over the deeper details and makes some necessary assumptions.
We all know what a website is. You’re looking at one. How do you build a website? You likely have an idea. Some HTML is presented to the world by some kind of web server software. But how does the web server know which HTML files to display? And how do people get from a name that they can type in their browser to your web server? How are IP’s involved, and is this something that can be done using your home Internet connection?
First, let’s talk about a web server. It’s just a computer that has software for serving websites. The most common server software is called Apache, and it’s compatible with just about any kind of website you may want to run. It handles the task of associating website requests with the collection of files that make up a website.
To run Apache we need a computer and an OS. We’re going to grab an old laptop and install Linux Mint on it. Linux Mint is a descendant of Ubuntu, so most Ubuntu tutorials will work fine with it.
For hardware we’re using a Vista-era laptop with a 64 bit dual core AMD Turion processor, 2GB memory and an old 120GB hard disk. Yes, we really should spend a few bucks and switch it to SSD. But this is just a thrown together project for the fun of it, and there’s no need to spend money on a simple experiment. Of course you don’t have to use an old laptop. A desktop computer would work fine, or a small form factor- anything really.
If you’re like me and want the server squirreled away on a shelf, keep in mind that you will need a monitor and keyboard to diagnose it when there are problems. A laptop has the benefit of having monitor and keyboard built in! This can come in very handy when it’s offline and you can’t figure out why.
An important note about the computer you choose: It needs to have a supported OS. In the x86 world, this means a 64 bit processor. Most modern Linux distributions don’t support 32 bit processors well or even at all. Without a supported OS, your project will lack current software. This will limit features, but also security. You wouldn’t run Windows XP on the Internet, so don’t settle on ancient versions of Linux.
First Step: Connect To Internet
A server deserves a wired connection when possible, but wireless is fine too as long as it’s reliable. Our ancient laptop doesn’t have a Wi-Fi adapter, so it is hard wired to our ISP provided modem/router/phone thingy. We also recommend that you configure the laptop for a static IP address so that its IP on your network never changes. You can do this in the router, or you can do it in the Ethernet configuration in Linux.
Configuring The Server
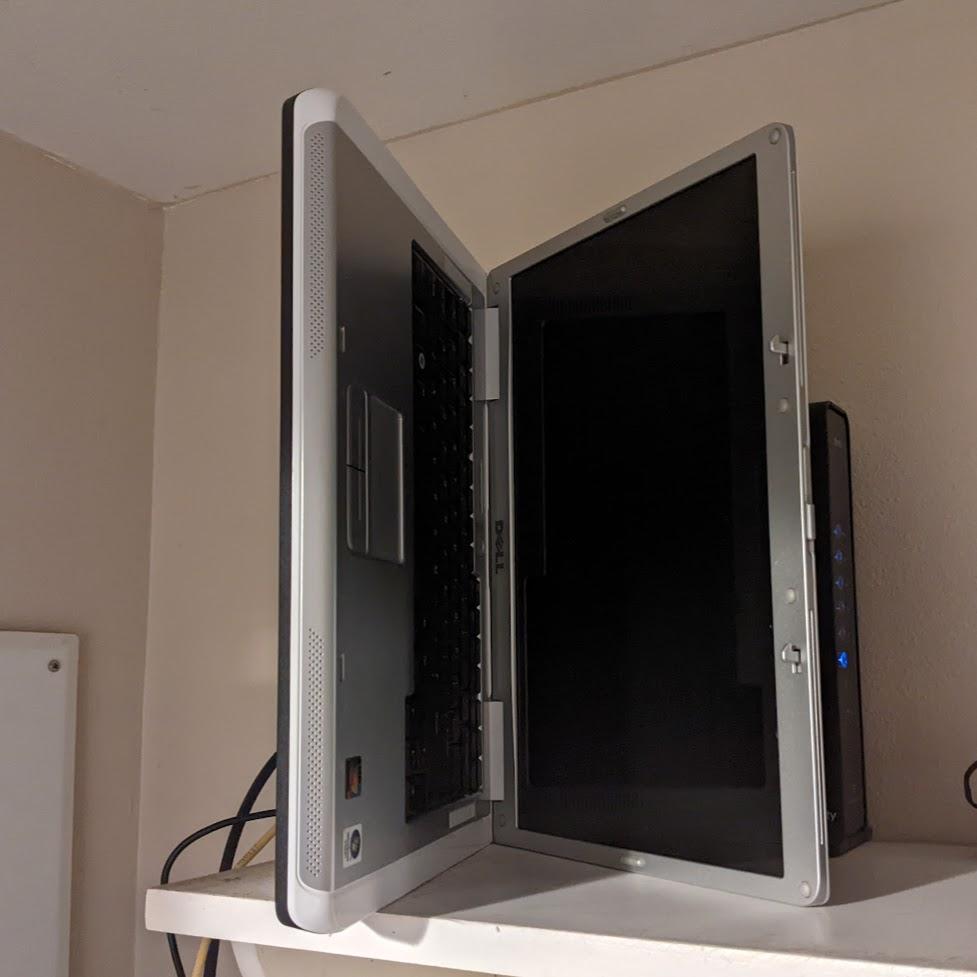
Next on our list is installing some basic tools for Linux such as the nano text editor for the command line and the SSH (Secure Shell) server software. SSH will allow you to connect to the server from another computer, and once SSH is installed, you can stuff the laptop on the shelf next to your router and forget about it. Don’t leave the laptop closed though- it needs ventilation, so at least leave the screen partially open. To save space, sit the laptop on its side with the vents facing up.

To log into the server you’ll need a terminal program. Most operating systems come with an SSH Terminal program such as Windows Terminal or the Terminal in Mac OS. I have been using MobaXterm on Windows for many years and I find it much more convenient. Some people prefer bare-bones SSH terminal programs such as PuTTY. Use what works for you, and get connected to your server by SSH’ing to its IP address.
Next, you’re going to need to install the Apache web server software. There are numerous tutorials online for doing this, but watch out: Many of them will have you do the basic install of Apache, MariaDB, and PHP, and then have you host your files in/var/www/htmlas the root user. Do not do this! You need to create what’s called an Apache Virtual Host and a new system user to associate it with.
Master Of Your Domain
Lastly, you need a domain name and a way to associate it with your Linux server. There are a large number of domain registrars to choose from, and you can get a .com domain name for under $10 USD/year. Common geek-approved registrars are Cloudflare or Namecheap. These are not endorsements, just a nudge in the right direction if you’ve never done this before. (Feel free to drop your reviews in the comments.)
To associate that domain to your server, you need the services of a Domain Name System (DNS) provider. DNS is what maps your domain name to an IP address through what’s called an address (A) record.
That’s one Dynamic IP you’ve got there, Mister
Many domain registrars provide free DNS services, but they aren’t optimized for hosting at home. Why not? If your server were sitting in a data center somewhere, it would be assigned a permanent IP address. But because you’re hosting it at home, the public IP of your network connection will change from time to time and your website will go offline until the IP is updated worldwide. You need a DNS provider that can detect the change and then update the A record of your domain accordingly.
There are many providers of such services and it’s even possible to make your own. But for simplicity, we are going to recommend running DNS at Cloudflare. Cloudflare provides a Content Delivery Network (CDN) for free that adds a layer between The World and your server. This is convenient because Cloudflare’s IP’s never change. When your server gets a new IP, it can communicate this to Cloudflare and they will route all traffic accordingly without having to update DNS around the world. This is a huge advantage. They also cache your website in their CDN so that when your website hits the front page of Hackaday, it can survive the onslaught of traffic!
Hiding your public IP from the world is another reason to use Cloudflare. The only IPs exposed to the world will be owned by Cloudflare, and they will forward web requests to your server while at the same time keeping the bad guys out. This gives another layer of protection to your home server and your home network in general. And the best part is that it’s completely free.
Their excellent documentation describes how to set up dynamic DNS with their service.
From Web Browser to Web Server And Back
Once you’ve got DNS and your web server configured, you need to tell your router at home to accept traffic on ports 80 and 443 (the ports for http and https traffic) and route them to your Linux Laptop. Some routers will let you set up a DMZ that will directly expose the entire server to the Internet, but this is not recommended or required. You’ll also want to configure the firewall on your server to accept traffic on port 80 and 443. And since we have 443 open, Let’s Encrypt our HTTP traffic, shall we?
Whether there is a technical advantage or not is debatable, but your website is going to need an SSL certificate.If nothing else, this will make your website more palatable to modern browsers who show warnings if there is no SSL certificate present. In the past, you’d need a static IP and to spend a good amount of money on the SSL Certificate. Neither of these things are the case now. The SSL Certificate can be provided by Let’s Encrypt, a free SSL/TLS certificate provider that uses software called Certbot to get the certificate and even configure Apache for you. Slick!
What else can you do with your new home server? The possibilities are almost endless! Even if you have fast internet, you can put your new server to work to speed things up even more. Running your own resolving DNS server locally means that you can cache DNS lookups on your own network, which speeds up DNS resolution. This can give a snappier feel to your web browsing experience. You can also use the Pi-Hole software to block all advertisers so that your devices do not need a separate ad blocker.
A home server also makes an excellent data collection point for your IOT projects and gives you a playground for experimentation. There are many hackers running home built servers, and some of them have even gone so far as to make their server run solely on solar, such as https://solar.lowtechmagazine.com/
We’ve outlined all of the moving pieces that you need. You should know though that just as there are countless ways to build any other project, there are a huge number of alternate routes you could take.
Instead of the Apache web server, you could use NGINX (pronounced ‘engine ex’). Instead of dynamic DNS, you could order a business class Internet connection with static IP’s. Instead of Linux, you could use BSD, Windows, MacOS, or any other number of Operating Systems. Instead of a laptop, you could use an old desktop, a Raspberry Pi of any flavor, a surplus rack mount server from your local Internet garage sale, or even an ESP8266 with a simple web server script on it.
Whatever you do, make sure to have fun with the project, and if you’ve never done such a thing, we recommend starting down the easiest road and working your way up to the more esoteric methods.
There remain many, many, many questions to be answered: What software should I use to create my project site? How deep down the rabbit hole should I go when it comes to documenting the project? What toppings do I want on my something-to-eat-while-hacking pizza? Stay tuned for the next installment, coming soon to a Hackaday near you!


