9 Ways to Fix Android Connected to WiFi But No Internet (2022)
A lot of Android users face a strange issue wherein the phone is connected to the WiFi network yet shows no internet. It can be very annoying and frustrating especially when you don’t know what’s causing the problem. If you are facing this issue right now, we do have some simple steps to troubleshoot the WiFi connectivity. Here, let’s look at different ways to fix Android connected to Wifi but no internet issue on your phone.
Related | 11 Ways to Fix WiFi Keeps Disconnecting & Reconnecting on Android
Fix Android Connected To WiFi But No Internet Issue
Table of Contents
The first thing you shall do is disconnect and reconnect to the WiFi network. It may sound very basic, but it fixes about half the Wifi-related problems on Android. So, if your phone is not connecting to the internet even after having an active WiFi network, turn the WiFi toggle off and on again to see if it fixes the problem.
This solution is just an upgraded version of the above fix and works most of the time. All you have to do is forget the WiFi network you are connecting to and then try connecting back to it again.
1. Open Settings > Network and Internet > WiFi on your Android phone.
2. Here, click the WiFi network you’re having trouble with.
3. Tap Forget and to forget and disconnect the WiFi
Now, connect back to the WiFi network. Ensure that you enter the correct password; otherwise, it’ll keep showing “Connecting, Saved” and won’t connect to the WiFi. If you can’t remember the password, here’s how to see the connected WiFi passwords.
All internet providers have a web-based dashboard or an app to connect and manage your Wireless broadband account. You can see if the connection is active or not by login into your dashboard. In my case, you can see that the Excitel service and connection are active.
Alternatively, you can also check the indicator lights on the router to see if something’s abnormal. There can be downtime from the internet service provider as well. Call your ISP’s customer care to check if there’s any problem with their services in your area.
Your router may be causing the problem. Restarting the router works in these scenarios. It will refresh your connection with the line and start working normally. But if it doesn’t, see if the router is blocking the network traffic in the router dashboard.
Open the browser on your computer and navigate to the router’s dashboard. Go to the Advanced tab and select Traffic Control. Disable it if turned on and check if the internet starts working on your phone.
The other option is to reset the router. Doing so will reset all existing settings and configurations and start it with the factory defaults. Usually, the routers have a reset hole where you can insert a SIM ejector tool to trigger the reset.
If you can’t find it, check the user manual that came with the router. Alternatively, you can log on to the router’s dashboard or app, go to the System or Configuration section and choose the Reset option.
Is there a firmware update available for your WiFi router? If yes, log in to your WiFi dashboard and allow the software update. Doing so may fix router-specific connectivity and performance issues or bugs that have been identified by the manufacturer.
Related- 6 Ways to Fix Android Can’t Connect to Wifi But Says Saved, Secured
DNS servers help translate the website links into IP addresses. If the internet is not working on your Android phone despite being connected to WiFi, it could be an issue with the domain server of your internet service provider.
You can try switching to a different DNS server to fix it, as shown below.
1. Open Settings on your phone.
2. Head to Network & Internet.
3. Here, click on Private DNS.
4. Change it from Automatic to Private DNS provider hostname.
5. Next, enter dns.google in the hostname field. Tap Save.
Alternatively, you can switch to Cloudflare DNS by entering one.one.one.one or 1dot1dot1dot1.cloudflare-dns.com. You can also use the Cloudflare app to enable it:
1. Install the 1.1.1.1 app from Google Play Store or App Store.
2. Open the app and accept the terms and conditions.

3. Tap the Menu and select 1.1.1.1.
4. Then, go back and enable the toggle.
Changing the DNS using the above methods will also override for WiFi. However, you do have the option to change DNS in WiFi settings separately. This can fix the WiFi connected but no internet connectivity message. To do so:
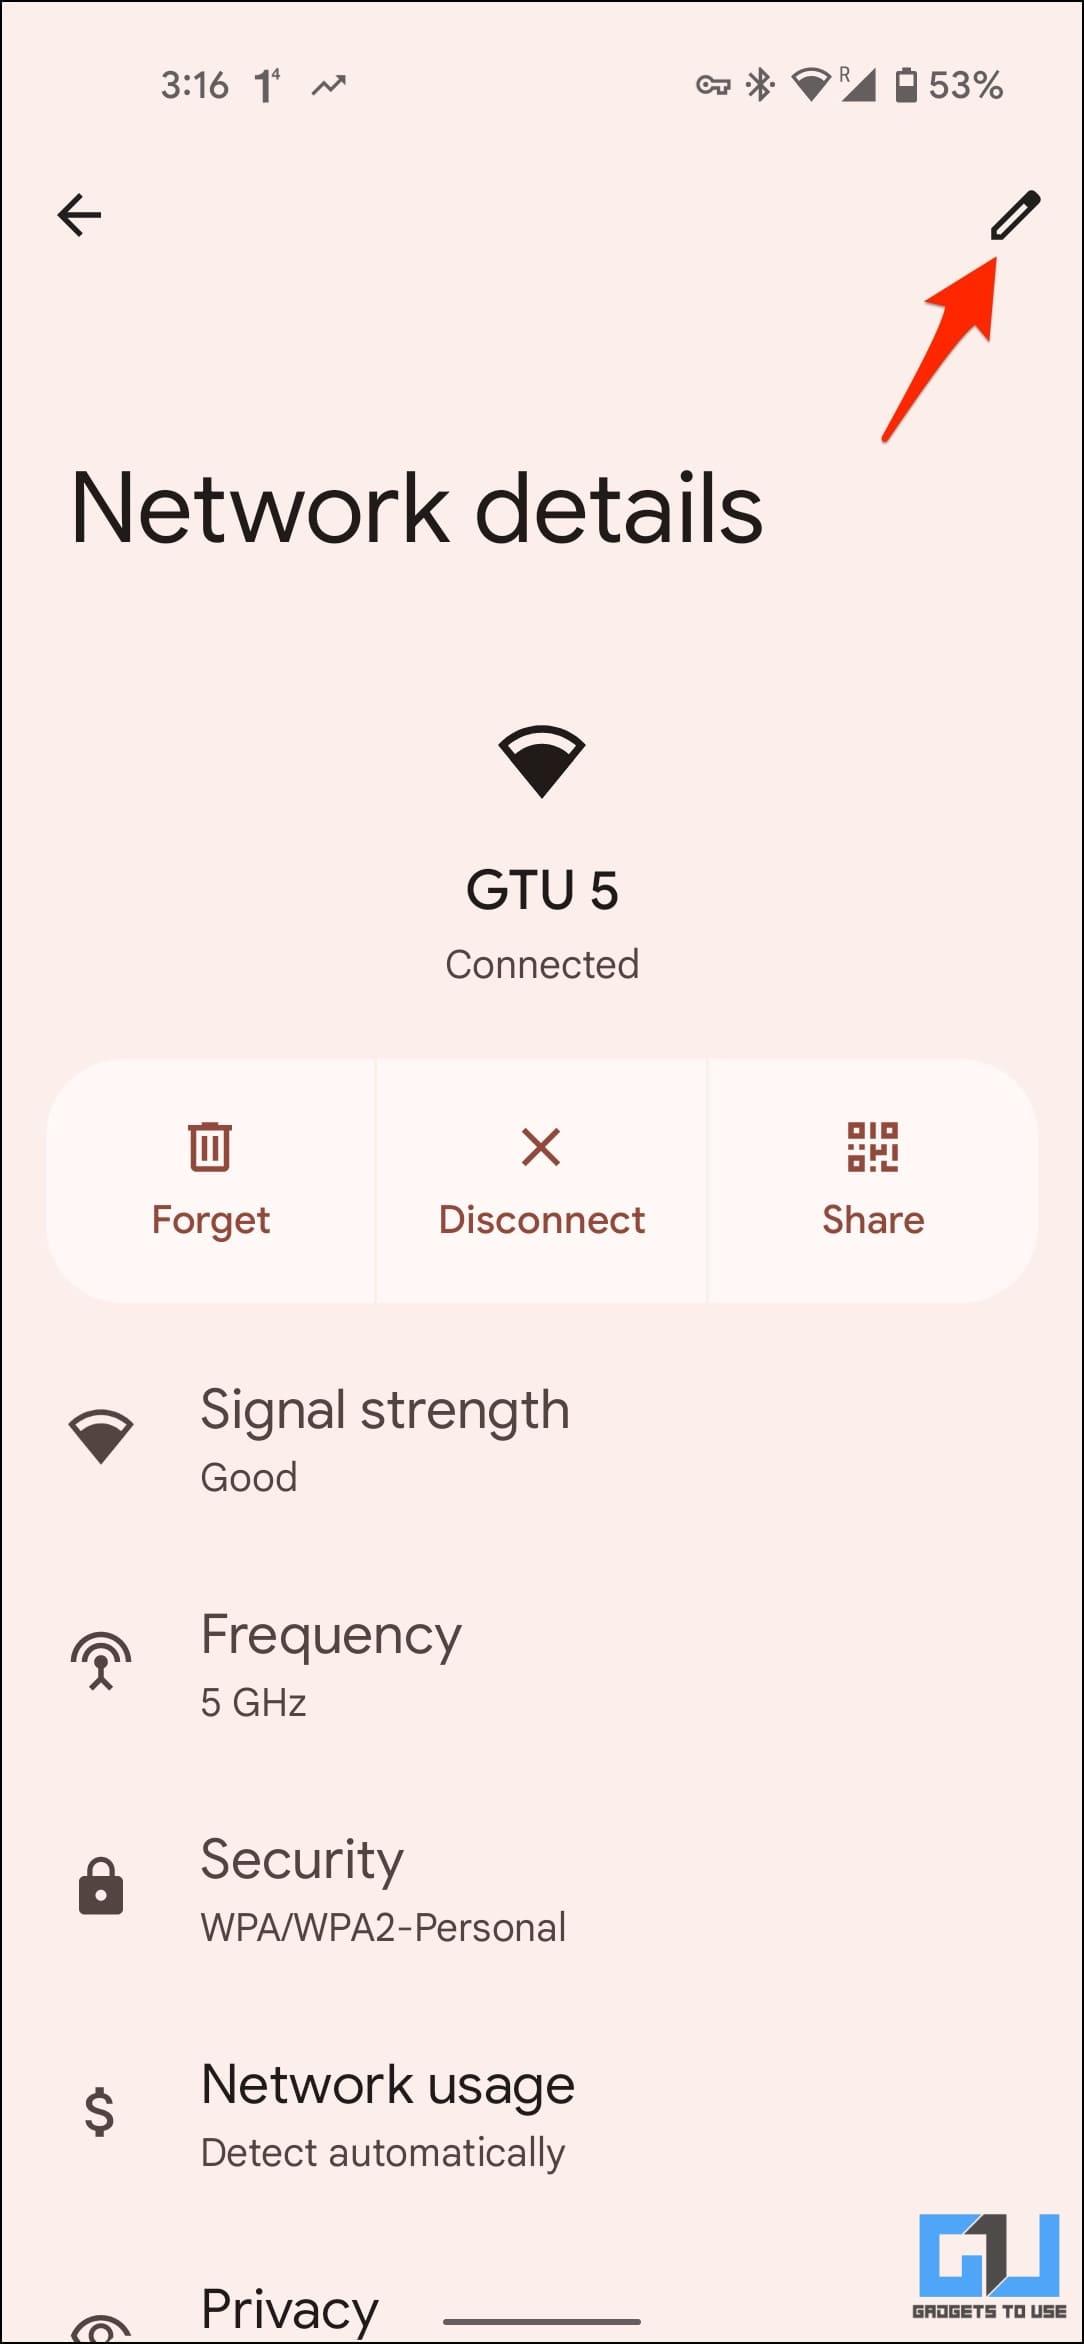
1. Go to WiFi settings and tap the WiFi name.
2. Press Edit or Modify Network. Change the IP settings to Static.
3. You can now enter a custom DNS address in DNS1 and DNS2.
Another thing that you should check is the date and time on your phone. Incorrect data and time settings may cause issues. To fix it:
1. Open Settings on your Android phone.
2. Navigate to System > Date & Time.
3. Here, enable the toggle for Set time automatically and Set time zone automatically.
Your phone will automatically sync and adjust the time based on your network and location.
For some users, enabling MAC Address Randomization in Developer Options fixed the WiFi connected no internet issue on Android. When you turn it on, your Android’s MAC address will change every time you connect to a network.
To enableMac Address Randomization:
1. Open Settings, scroll down and click on About Phone.
2. Here, tap the Build Number seven times to enable Developer Options.
3. Now, go back to Settings > System > Developer Options.
4. Enable the toggle for WiFi Non-persistent MAC Randomization.
Android 12 comes with a shortcut to reset the internet on phone. Using it, you can quickly reset your current connection settings and refresh your Wi-Fi network, as shown below:
1. Open Settings > Network & Internet on your phone.
2. Here, click on Internet.
3. Click the Reset icon at the top right.
Your Android phone will now refresh the WiFi and mobile data connectivity on your phone and then reconnect to the most recently used or preferred local network.
If you are still facing the WiFi internet connectivity issues on your Android phone, it’s advised to reset the network settings. It will only reset the network settings and won’t affect any other data.
Here’s how to do it:
1. Open Settings on your Android phone.
2. Scroll down and go to System > Reset options.
3. Here, click on Reset WiFi, Mobile & Bluetooth.
4. Tap Reset Settings to confirm.
Your saved WiFi passwords, Bluetooth connections, and mobile network settings will be reset. You will now have to reconnect to the WiFi network.
Apart from the solutions above, you can further try the methods below to see if they solve the connectivity issues:
Related | 4 Ways to Check Internet Speed on Your Android Smartphone
Wrapping up
This is how you can diagnose the situation where your phone is connected to Wi-Fi but has no internet. These fixes will most probably fix anything wrong with your network devices but if none of those worked for you then you have to contact your internet provider for help.
You can also follow us for instant tech news at Google News or for tips and tricks, smartphones & gadgets reviews, join GadgetsToUse Telegram Group, or for the latest review videos subscribe GadgetsToUse Youtube Channel.


