Windows 11/10 not detecting HDMI TV
In some cases, as a PC user, on your Windows 11 or Windows 10 computer, you may encounter the issue whereby your PC can’t project to another screen, Surface does not connect to TV or Second screen, or Windows cannot detect the second monitor. In this post, we provide the most suitable solutions to resolve the Windows not detecting HDMI TV issue.
Windows 11/10 not detecting HDMI TV
If on your PC, Windows 11/10 is not detecting HDMI TV, you can try our recommended solutions below in no particular order and see if that helps to resolve the issue on your device.
Let’s take a look at the description of the process involved concerning each of the listed solutions.
Before you proceed with the solutions below, we suggest you run the following basic troubleshooting routines:
You can proceed with the solutions listed below if after the pre-checks above your PC still can’t establish an HDMI connection with the HDMI TV or monitor.
This solution to the Windows 11/10 is not detecting HDMI TV issue requires you to restart the PC with the HDMI cable attached and TV turned on. After your PC has restarted, follow the instructions in the guide on how to connect Windows Laptop to TV or Projector via HDMI to be sure you properly and correctly set up your PC with the HDMI TV or monitor.
After the setup and you connect your computer to the TV via HDMI cable, make sure that you select the correct HDMI port from your TV remote (since most TV have multiple HDMI ports named HDMI 1, HDMI 2, etc) and on your PC make sure the HDMI TV is set as default/primary device.
You may encounter the issue in hand if you are trying to connect an old monitor or TV to your Windows 11/10 PC – Windows might have a problem detecting the HDMI TV automatically. In this case, to resolve the issue, you need to manually detect the display.
To manually detect Display in Windows 11, do the following:
To manually detect Display in Windows 10, do the following:
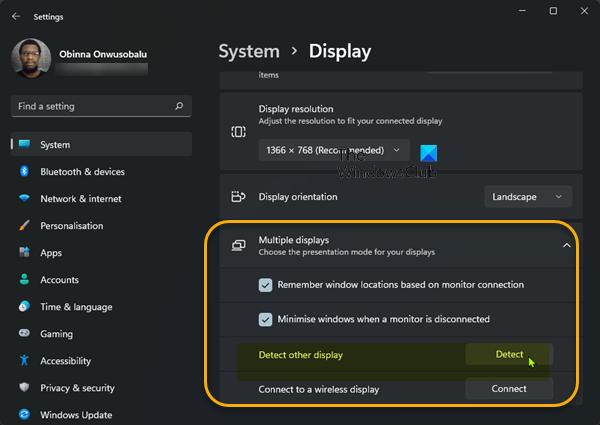
You can now check if your PC detects the connected HDMI TV. Otherwise, try the next solution.
In Windows 11/10, PC users can project visuals to a second monitor using any of the following options:
This solution requires you to do the following: With your PC connected to your HDMI TV/monitor, use the WinKey+P keyboard shortcut to launch the Windows Project to a second screen menu, and make sure that the projection setting isn’t set to PC screen only option.
If this is not the case, but the issue in hand is unresolved, try the next solution.
This solution requires you to update your graphics driver installed on your Windows 11/10 PC and see if that helps to resolve the issue in view. You can manually update drivers via Device Manager if you have already downloaded the .inf or .sys file for the driver, or update the driver via Command Prompt.
You can as well get the driver updates on the Optional Updates section under Windows Update or you may also download the latest version of the driver from the graphics card manufacturer’s website. Alternatively, you can use any of the free Driver Update software to automatically update your drivers on your system.
This solution requires you to manually change your PC’s Multiple Displays Operating Mode using the Intel Graphics Control Panel. Here’s how:
For NVIDIA users, you can install/update the NVIDIA Control Panel from the Microsoft Store and then manually force-detect your HDMI monitor or TV by following the instructions at nvidia.custhelp.com.
For AMD users, the AMD Radeon Settings can be configured as described at amd.com/en/support to force-detect an HDMI display on your PC.
But before that, ensure your AMD or NVIDIA graphics card driver is up-to-date.
To rule out the possibility of a faulty HDMI TV or monitor, this solution requires you to run the Hardware and Devices Troubleshooter to fix problematic devices. You can also manually check for faulty components if the issue isn’t with new hardware – otherwise, you may consider replacing the HDMI TV.
Hope this helps!
Related post: HDMI Audio device not detected in Windows
There could be a number of reasons why your computer is unable to detect your TV HDMI. In any case, try the following basic suggestions:
The message No Signal may be displayed on your TV screen after selecting an input. So, make sure the correct input is selected and you select an input that’s connected to an active device. This message may appear after updating your Android TV software.

